Friday, 29 November 2013

More time :)

 Hello all, I hope you are well.
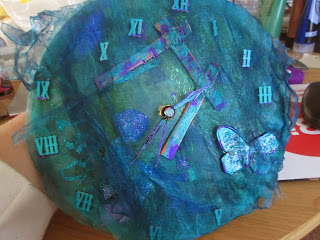
Sticking with the clocks for now, here is one I finished today in time for the Christmas craft fayre this evening (it did not sell though).
Again using a canvas board as a base, I applied green and blue acrylic paints and peacock and green metallic paints-the finished base effect was reminiscent of the impressionist school of painting, well, I think it is any way!
A stencil (Glitzcraft) of a fairy was placed in the bottom left and glitter frosting (colours used: Royal blue, Aqua Blue, lavender and dark green) used to put the image on the base.


Angelina fibres were glued liberally to the base on the right hand side and left to dry while I heated up some strips of friendly plastic and formed them into an open sided rectangular shape, I also heated up a piece and stamped a butterfly (Visible Image small butterfly stamp) into it.  Once the friendly plastic had cooled, I cut out the butterfly shape and then applied some metallic multi surface paint in peacock, royal purple and copper to both mouldings, the butterfly also got a generous helping of iridescent glitter!


 A piece of green organza was then attached to cover the whole surface. The friendly plastic was stuck on top of this.  A piece of blue organza was then attached over the top of everything and blasted with the heat tool-the centre area of the blue organza was cut out to allow the movement of the clock hands and some cuts were made in it to allow the wings of the butterfly to appear to poke out.  The clock hands were scuffed with sandpaper and a little of the metallic paint dabbed on them.

Small wooden Roman numerals were painted in peacock to match and then placed around the clock face-while I did not want them to look entirely uniform, they are at least in vaguely the right positions to be able to tell the time!

 Thank you for reading, please leave a comment (it's always nice to know whether people like what I make, or if they don't!) and happy crafting :)
x

Challenges entered:

Visible Image- make it sparkle
Happy Campers- Glitter it
Imagination Crafts- Glitter and Sparkle
WhoopsiDaisy- Things with wings

Events I will be at:
Saturday 30th November- Rhuddlan Artisan Fair
Sunday 1st December- Botanical Garden Christmas Event
Saturday 14th December- Christmas Craft Weekend Fayre 
This event is in Rhyl Town Hall, there will be an ice rink outside in the town square, as well as Santa's grotto and all kinds of fun stuff.
Sunday 15th December - Christmas Craft Weekend Fayre

Monday, 25 November 2013

Time for a Clock ;)

Hello there everyone, I hope you are all well.

I am much better than I was when I last posted! Thank you for the kind, supportive comments you have made to me about that last post of mine-it's wonderful to know I am not alone.

This post has been a while in the making! I have been meaning to produce clocks for months now-so, without further ado, here it is:


I find metallic paint very difficult to portray in a photograph! It looks much more dramatic in reality than it does here!!
I used acrylic paints in: burnt umber, raw sienna, metallic copper, metallic copper gold.
Glitter frosting in Brown, sand, copper and gold  (with the clocks mask)
lutradur paper-like fabric, friendly plastic and some two tone (copper/black) organza-all of which were heated with a heat tool before having paint applied.
pocket watch stamp (visible image) was used with paint rather than ink
stars are crafters' clay (Martha Stewart I think) then painted to match.
Paper flowers were painted to match and then layered before being attached to corner of lutradur.

Various clock and watch charms in bronze colour are from my stash.

The clock hands were painted with the metallics to match the rest of the piece.

Whole thing was done using a 10x12 canvas board as a base.
All quite the experiment, but now I know what works, I shall make some more along similar lines :)
Was absolutely good fun to make-which is what art and crafting is all about, right?

Let me know what you think,
Happy crafting
x

Challenges entered:
Visible image- make it sparkle  (the metallic paint does sparkle and there are angelina fibres on here beneath the lutradur too-difficult to see from the photo I know)

Thursday, 21 November 2013

Dear Pain...a daily survivor of the struggle against my own body and mind

I tweeted this at half six this morning:
Dear pain, while you may be my constant companion, I would like it if you let me have a chance to have a life. That is all.

I don't usually go around telling complete strangers that I am anything but awesome!  I just feel that, since I am certainly not the only one, it is time to say something about it.  I am in constant pain each and every moment-whether I move or keep still has no bearing on it. The everyday pain I am now used to and go about doing things just as others go about their day.  It is when the pain becomes so terrible that you can barely move and it feels as if your back and shoulders are on fire-that is when it stops me in my tracks and interferes with my life.  I don't look ill.  There is no cure for this and very little understanding from the world in general which makes the suffering something that is usually done in silence as nobody gets it and complaining just makes you unwanted.  For anyone who would like an idea of what it is like to live each day with an invisible illness-the spoon theory is an excellent analogy that attempts to make it a bit easier to understand.  While written by a woman with lupus, it is applicable to other conditions, particularly to fibromyalgia.
My increased pain exacerbates my depression. Depression lowers your pain threshold, thereby making my pain seem worse.  Vicious circle anyone?

Today it took me two hours and codeine to be able to get out of bed.  I am supposed to be on my stall on the market attempting to earn some money and make a living.  The pain took that away from me.  I will instead list items in my online store and would very much appreciate it if you could perhaps spam my website address all over the place :)
www.craftyshutterbug.co.uk

On the plus side, I have found my camera!  So I will be able to add pictures to my post from yesterday-and perhaps post again later if I manage to make anything new.

If you read just one thing today, please take the time to make it the spoon theory.  Thank you for stopping by.  Happy crafting ;) x

Wednesday, 20 November 2013

Busy, busy

So, today is my day to be blogging a new card or something I have crafted. While I have been really busy all this week making cards and items to stock my stall with, I don;t actually have a single thing I am going to be able to blog as it seems I have misplaced my camera (like the genius I am!).  I wanted to share with you all some of the candles I have been working on lately-particularly the gift set I have put together but without a picture, it is going to be very difficult to let you know what I have done!  I shall endeavour to describe it all, and then will add a photo when I discover the hiding place of my camera!

I just got finished covering a box in tasteful black paper so that I can display the candles within it, making it the perfect gift for someone as we move ever closer to the festive season.  I took a pillar candle 4.5' tall-purple and delightfully scented with blackberry and apple mmmm, and decorated it with a fairy woodland scene all silhouetted against the wonderful purple of the candle.  The wings on one of the fairies I then painted white and added some iridescent glitter for that extra touch of sparkle.
I then used a matching small votive candle, I wrote the words 'Happy Christmas' in silver on the outside of the glass and painted some snowflakes in white around the top of the candle-these I added the glitter to as well.  The wording can be replaced with any a customer would want-even a name can be written on the glass.

To finish off the presentation, I took a sheet of white tissue paper and stamped fairies and stars on it in versafine Imperial Purple ink-this matches so well with the candles and is exactly the right way to display these within the classy black box.  I could even provide a hand made personalised gift tag if required-leaving absolutely no work for you to do!

I have these events coming up and would love it if you could pop by and say hello, and have a look at my work for yourself:

Thursday 21st November- Rhyl Market, High Street 9-5
Saturday 23rd November- One Big CrafTEA Fair
Thursday 28th November- Rhyl Market, High Street 9-5
Thursday 28th November- Let's Get Crafty...Again Prestatyn High School
Saturday 30th November- Rhuddlan Artisan Fair
Sunday 1st December- Botanical Garden Christmas Event
Saturday 14th December- Christmas Craft Weekend Fayre 
This event is in Rhyl Town Hall, there will be an ice rink outside in the town square, as well as Santa's grotto and all kinds of fun stuff.
Sunday 15th December - Christmas Craft Weekend Fayre

Photos of the above described candle gift set:

The big candle:


the small candle:
the tissue paper:
The finished gift set:

Gift set is £10.

Thursday, 14 November 2013

Cute Christmas

Hello to one and all,
I hope you all are well. I am very much the night owl right now as I have cancelled all sleep between now and Christmas!  I am up late now finishing off some cards in between loading up my car for the market in the morning-although the wind is howling around my caravan at quite a pace :(
I like to have a new offering to add to my stall each time I am at the market, so here is this week's (design by the wonderful Cheremane Smith):

(apologies for the image quality-I took it on my phone and emailed it to myself, I am not great with technology-just ask my brother!!)

Using a 6x6 card blank as the base.  The cute lil guy in the stocking is a stamp from Fizzy Moon (same as the other cute stamp I used in my last post) and I coloured the image using Promarkers.  The white fluffy edging around the top of the stocking and the brim of the hat are covered in white flower soft to appear all cuddly-adding to the all round adorable appeal of this character!
The wooden plank stamp by Visible Image was stamped in the shape of a fireplace using Weathered Wood distress ink and the Christmas Wishes sentiment stamp by Dreamees was stamped above the fireplace using onyx black versafine ink. This was attached to some silver mirror card and the whole thing stuck to coloured pearlescent card that had been embossed using the embossabilities snowflake folder.
A single card candi was placed in the centre of the fireplace using a foampad and the bear/stocking image was stuck using pinflair-the thin ribbon displayed as if it is hanging from the fireplace.
That same thin ribbon is used again in the top corner, along with a silver coloured metal charm in the shape of a gift (I sell these charms-currently in packs of 8 for £1, bargain!).
I have done these cards in the blue seen here, a slightly darker blue, pink, red and lilac.
Priced at just £1.75 each, I expect these will sell quite well.

Off to try to get some sleep now-being swayed about a bit though by the wind! Let's hope I don;t get blown out to sea!!
Have a great day everyone x
Events coming up:
23 November- One Big CrafTEA Fair
28 November- Rhyl Market, High Street 9-5
28 November- Let's Get Crafty...Again Prestatyn High School
30 November- Rhuddlan Artisan Fair
1 December-Botanical Garden Christmas Event

Thursday, 7 November 2013

Cute and Cuddly

Greetings one and all,
I hope you are all well :)
Sadly, I was unable to be on my stall on Rhyl market today due to pain in my lower back but it is gradually easing so I feel I should be being productive while resting on the sofa!

Today is a card that is really quite different to my usual ones-this one is brightly coloured and cute! (and, for a change right now, not remotely Christmas related!!)


The Fuzzy Moon stamp was coloured in using Promarkers and attached to a decorative die cut (Marianne die bought from Doodleso in Prestatyn) before being placed in the centre of a large paper flower (available at 3 packs for £1 at Donna's Kraft Kabin in Rhyl). I like to support local business when I can :)
A Spellbinders Grand Stately Circle (the smallest one) was then distressed around the edge with Mowed Grass distress ink and the flower/cute bear combo was attached to the centre.

Some mint green card was embossed using a music score embossing folder-this was attached to the front of a card blank. A strip of orange card was layered horizontally across this and then the topper attached using foam pads. Finished off with a sentiment stamped in green, some ribbon down the right hand side and some green tinted pearls on the ribbon.
Let me know what you think please guys-I always think whenever I try cute it looks like a child has made it!

Challenges entered:
creative card crew- teddy bears
card crafters circle- cute cards
challenges for everybody- anything goes

Sunday, 3 November 2013

Happily Ever After

Greetings one and all,
Having a fabulous weekend, I trust?
Today's post is a card I made for my friends in The US who got married very recently (congrats to you both, Steve and Lourdes).
I am in the midst of making Christmas cards so couldn't help but carry the magical theme across to this card, but a card to celebrate a marriage seems to me like it should be a bit magical :)


Stamps used are all from Lavinia Stamps I think: tree root, climbing ivy, star gazers, stars 1, star cluster, fairy dust silhouette, fairy dust is like love and happily ever after.
The process:
Using a brayer (an ink duster or distress tool would work just as well), some colour was added to white card as a background-Adirondack inks in Wild Plum and Eggplant.  Then using versafine in onyx black, the tree, star gazing couple and fairy dust silhouette were placed on the card.  I used the black ink and a brush to create the branch of the tree as I felt it was just more visually pleasing to have that fairy on a branch.
I ripped some card to shape and then distressed the eggplant ink along the bottom of the card, to give the impression that the couple were sitting on a rise by a lake. Climbing ivy was then stamped down both edges of the card multiple times in eggplant, versafine deep lagoon and the onyx black. Adirondack ink in sail boat blue was used to distress the edges all around the card, as well as to create the appearance of a lake in the bottom right corner.

Stars in wild plum and deep lagoon (highlighted with white opal liquid pearls after this image was taken) are what the couple are gazing at!

The wording 'Fairy dust is like love, it creates magic whenever you give it away' was stamped in onyx black and then stamped over in versamark and heat embossed using Sparkling Snow Wow powder. The words 'Happily ever after' were also embossed the same.

This scene was then layered on black card and mounted onto a purple pearlescent card.
I always find it fun working with fantastical/mythical imagery and this card was no exception!
I hope you have enjoyed reading about the making of this.
Take care,
until next time
x

Challenges entered:

Sparkle n Sprinkle- use embossing powder
LEJDesigns- Anything Goes
Through The Craft Room Door- Anything Goes