I haven't made anything, I just wanted to wish everyone in blogland a Happy Christmas, may your day be filled with love and awesomeness.
There will be a few Christmas themed posts to come before the new year, but then on to new things for the new year. May I take this opportunity to thank you all for your support over the past months and I look forward to this community growing together in 2014.
Thank you, all the very best to each of you and your loved ones this festive season and beyond.
Happy crafting and Happy Christmas
x
Wednesday, 25 December 2013
Saturday, 21 December 2013
Merry Christmas
Greetings to one and all!
I hope everyone is well, apologies for my silence just recently-it's been a busy time with some pain flare ups thrown in so my time has just not been my own! is everyone ready for the festive season?
I was going to make Christmas presents this year but I just have not had time so I have utilised other artisan types and sourced presents from them-I only had 2 to get as my family is small ;)
A Christmas card today that was great fun to make.
Last week, I was lucky enough to have a few hours of crafty fun with the wonderful Cheremane and she introduced me to Imagination Crafts Sparkle Medium. I really enjoyed playing with it!

So the centre piece of today's card is Stamps Away Wreath stencil produced on Imagination Crafts black glossy card using Berries Sparkle Medium (it's a red/green combination that to me just screams 'Christmas'!).
Once it was dry, I cut around it and attached it to a die cut black circle then glittered around the edge with ultra fine black glitter and layered this onto a bigger die cut red circle using foam tape to make the image stand out from the card. (die set used: Spellbinders Grand Stately Circles)

I distressed the edges of an 8x8 card blank with Festive Berries ink.
Green silky crush ribbon was attached in two directions to a piece of black card (7.5x7.5) and a bow tied and stuck where the ribbons crossed. The wreath centre piece was then stuck onto this using foam tape, some small paper flowers from my stash were added (a few were dragged across some distress ink first to add some colour to match the wreath) and gems were placed in the corner of the card as well as dotted around the wreath.
I am quite pleased with the result-let me know what you think!
I shall shortly be packing up my gear to go and be with my family for Christmas, I wish each and every one of you all the best for the season. Happy Christmas, and Happy Crafting!
x
Challenges entered:
Imagination Crafts- Merry Christmas
Craft-Dee bowZ- Anything goes with a handmade bow
Sparkle N Sprinkle- Anything Goes: use glitter, embossing powder, and/or flocking
Through The Purple Haze- Here comes Christmas
Use Your Stuff- Ribbons
Sunday, 8 December 2013
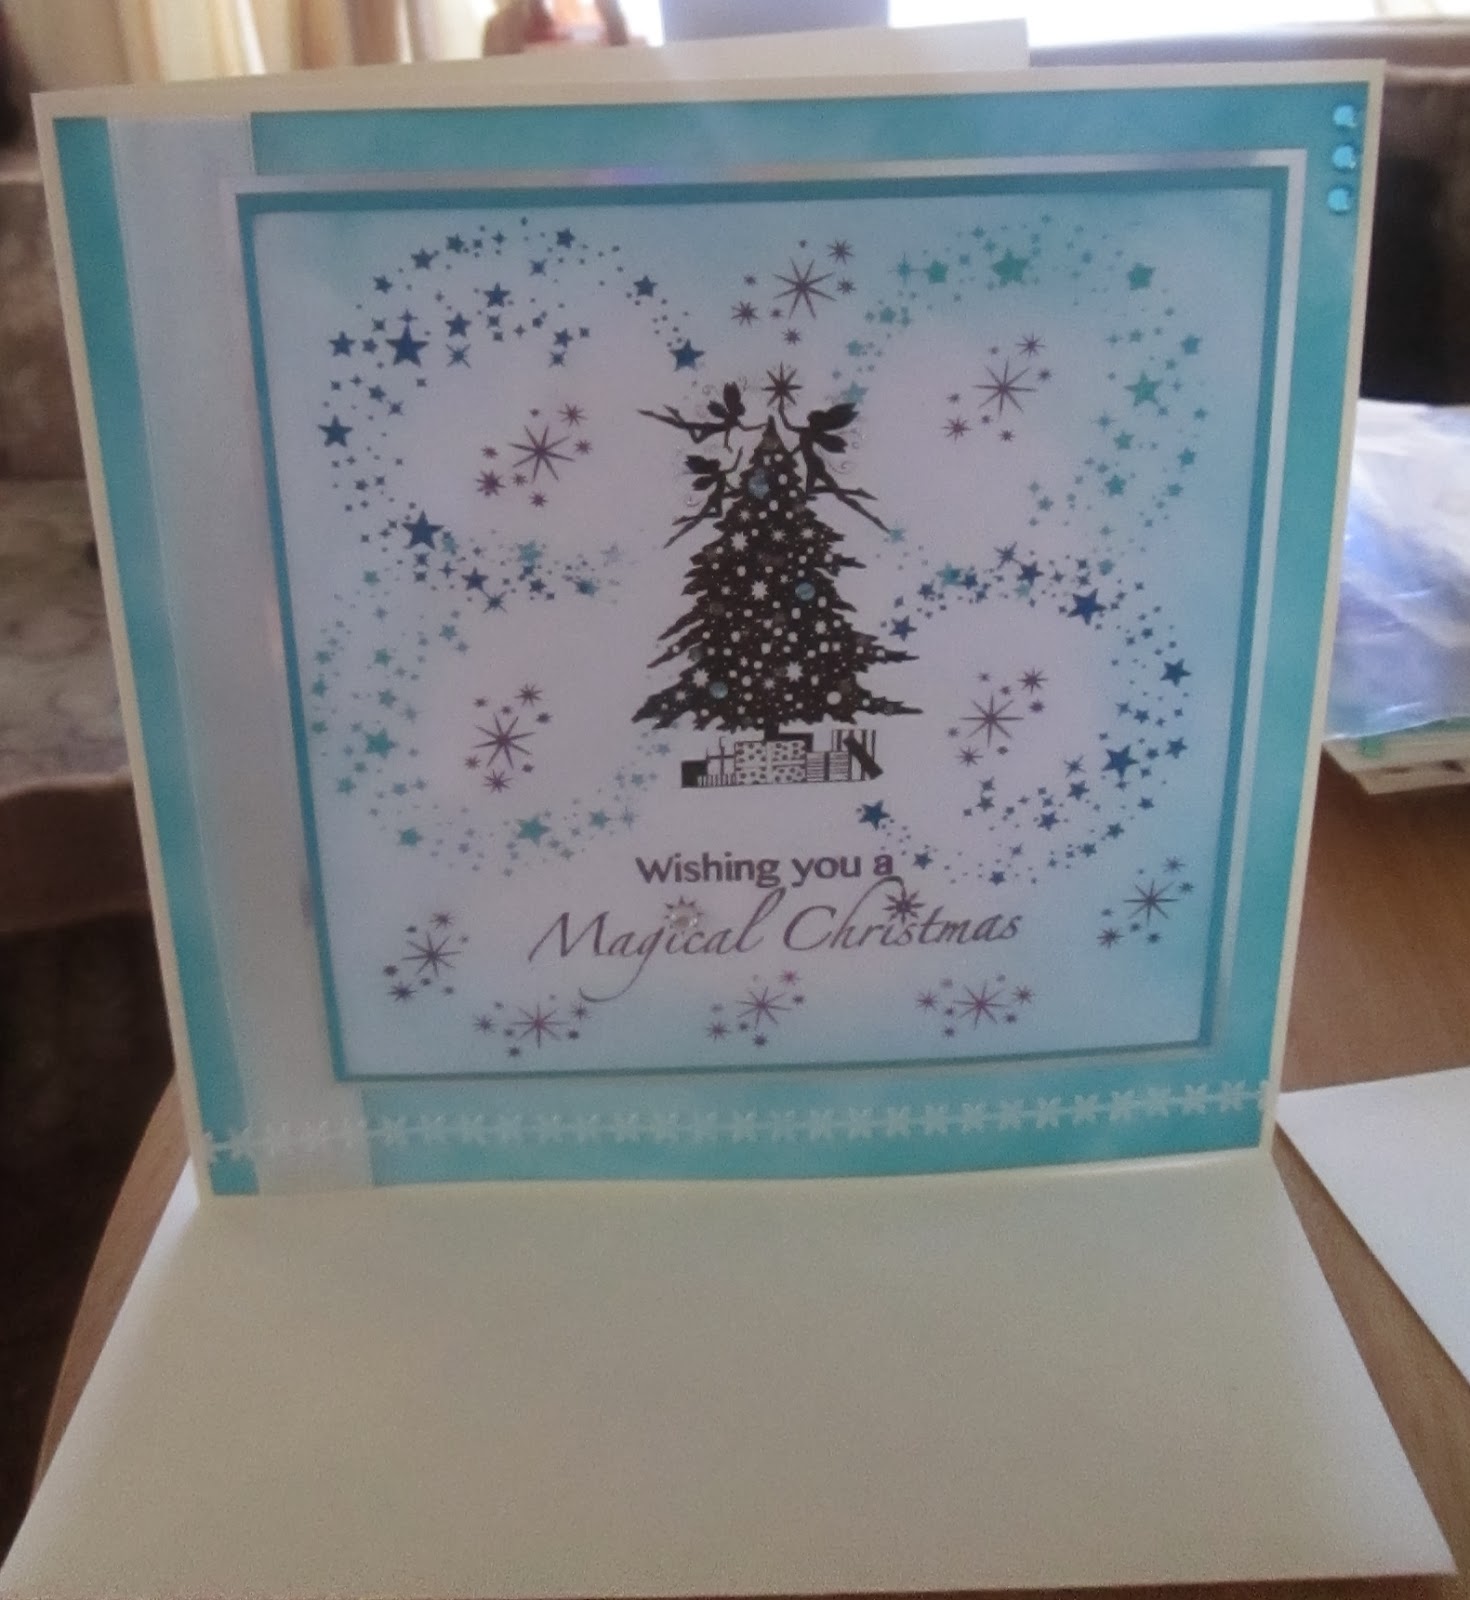
Magical Christmas card :)
Greetings to you all,
I hope you are well on this chilly December day (shush you people in Australia).
When it is so cold outside, the best thing to do is stay in and craft!
Christmas cards have me feeling festive so I thought I would share that feeling with you all today-just before I go and start baking my first batch of Christmas cookies for this year ;)

Beginning with an 8x8 card blank, I distressed a piece of card (slightly smaller than the base card) with Dusty Concord ink and did the same to a piece of card 6x6.
Stamped the fairy christmas tree image (Lavinia Stamps) in Versafine Onyx Black, the 'Wishing you a Magical Christmas' sentiment (Stamps by Chloe) in Versafine Deep Lagoon and the using the spiral of stars and stars 2 stamps (Lavinia Stamps) along with Versafine Imperial Purple and Deep Lagoon, Adirondack Wild Plum and Memento Cottage Ivy-brought some colour and Christmas cheer to the card.
This was then layered on mirror card, some plain silky white ribbon was attached down the left side of the larger piece of card and some pearlescent effect stars ribbon was attached along the bottom of it before it was stuck in the centre of the card blank. The mirror card was layered in the centre(ish) of this and 3 gems put in the top corner to finish off.
I also have done this design in teal and in green:


I may do one in red and one in blue-just to see what they look like!
That's it from me for today, I am going to bake now
So, until next time: Happy crafting :)
I hope you are well on this chilly December day (shush you people in Australia).
When it is so cold outside, the best thing to do is stay in and craft!
Christmas cards have me feeling festive so I thought I would share that feeling with you all today-just before I go and start baking my first batch of Christmas cookies for this year ;)

Beginning with an 8x8 card blank, I distressed a piece of card (slightly smaller than the base card) with Dusty Concord ink and did the same to a piece of card 6x6.
Stamped the fairy christmas tree image (Lavinia Stamps) in Versafine Onyx Black, the 'Wishing you a Magical Christmas' sentiment (Stamps by Chloe) in Versafine Deep Lagoon and the using the spiral of stars and stars 2 stamps (Lavinia Stamps) along with Versafine Imperial Purple and Deep Lagoon, Adirondack Wild Plum and Memento Cottage Ivy-brought some colour and Christmas cheer to the card.
This was then layered on mirror card, some plain silky white ribbon was attached down the left side of the larger piece of card and some pearlescent effect stars ribbon was attached along the bottom of it before it was stuck in the centre of the card blank. The mirror card was layered in the centre(ish) of this and 3 gems put in the top corner to finish off.
I also have done this design in teal and in green:

I may do one in red and one in blue-just to see what they look like!
That's it from me for today, I am going to bake now
So, until next time: Happy crafting :)
Friday, 6 December 2013
A Raffle
I am using today to take stock of things, and get back into the swing of working after a few days of being lazy.
The event I will next be at (Christmas Craft Weekend Fayre14th and 15th at Rhyl Town Hall) will probably be the last one I get to do before Christmas, so I have to make enough money to pay all my bills and ensure I have a place to come back to after spending a few days with my family! With this in mind, I have decided to hold a raffle that weekend-I figure I am not the only one who is broke right now, so, for a pound, people will have the opportunity to become the owner of this unique art deco inspired, hand painted lantern, featuring a wonderful black cherry scented candle.
Anyone unable to attend the event who would like the chance to partake in this raffle can do so via Paypal-just £1 will get you a strip of tickets-that is 5 chances to win!! If you live outside of the North Wales/Cheshire area, delivery will be covered by me so don't let location put you off having a go! Email address to use for Paypal payments is: Craftyshutterbug@gmail.com
I wish everyone the best of luck :)
The event I will next be at (Christmas Craft Weekend Fayre14th and 15th at Rhyl Town Hall) will probably be the last one I get to do before Christmas, so I have to make enough money to pay all my bills and ensure I have a place to come back to after spending a few days with my family! With this in mind, I have decided to hold a raffle that weekend-I figure I am not the only one who is broke right now, so, for a pound, people will have the opportunity to become the owner of this unique art deco inspired, hand painted lantern, featuring a wonderful black cherry scented candle.
 |
| WIN THIS!! |
Anyone unable to attend the event who would like the chance to partake in this raffle can do so via Paypal-just £1 will get you a strip of tickets-that is 5 chances to win!! If you live outside of the North Wales/Cheshire area, delivery will be covered by me so don't let location put you off having a go! Email address to use for Paypal payments is: Craftyshutterbug@gmail.com
I wish everyone the best of luck :)
Flood waters retreating
Greetings one and all,
Just a brief post to let everyone know that I am safe and dry! I managed to escape the flooding, just. The road outside has now just been reopened so I am no longer trapped inside the caravan park. I took some pictures yesterday of the golf course across the road-it was disguised as a lake!
I was standing in the caravan park when I took this! I am so glad that the night time high tide did not see the sea wall breached again, or I'd have been swimming at midnight in my living room!
As the clean up continues, I wanted to say thank you and let you know how grateful I am to have people who care-you know who you are, I appreciate you contacting me last night to let me know I am not alone, you rock.
Just a brief post to let everyone know that I am safe and dry! I managed to escape the flooding, just. The road outside has now just been reopened so I am no longer trapped inside the caravan park. I took some pictures yesterday of the golf course across the road-it was disguised as a lake!
 |
| Golf course somewhere beneath all this water! |
I was standing in the caravan park when I took this! I am so glad that the night time high tide did not see the sea wall breached again, or I'd have been swimming at midnight in my living room!
As the clean up continues, I wanted to say thank you and let you know how grateful I am to have people who care-you know who you are, I appreciate you contacting me last night to let me know I am not alone, you rock.
Friday, 29 November 2013
More time :)
Sticking with the clocks for now, here is one I finished today in time for the Christmas craft fayre this evening (it did not sell though).
Again using a canvas board as a base, I applied green and blue acrylic paints and peacock and green metallic paints-the finished base effect was reminiscent of the impressionist school of painting, well, I think it is any way!
A stencil (Glitzcraft) of a fairy was placed in the bottom left and glitter frosting (colours used: Royal blue, Aqua Blue, lavender and dark green) used to put the image on the base.

Angelina fibres were glued liberally to the base on the right hand side and left to dry while I heated up some strips of friendly plastic and formed them into an open sided rectangular shape, I also heated up a piece and stamped a butterfly (Visible Image small butterfly stamp) into it. Once the friendly plastic had cooled, I cut out the butterfly shape and then applied some metallic multi surface paint in peacock, royal purple and copper to both mouldings, the butterfly also got a generous helping of iridescent glitter!

A piece of green organza was then attached to cover the whole surface. The friendly plastic was stuck on top of this. A piece of blue organza was then attached over the top of everything and blasted with the heat tool-the centre area of the blue organza was cut out to allow the movement of the clock hands and some cuts were made in it to allow the wings of the butterfly to appear to poke out. The clock hands were scuffed with sandpaper and a little of the metallic paint dabbed on them.
Small wooden Roman numerals were painted in peacock to match and then placed around the clock face-while I did not want them to look entirely uniform, they are at least in vaguely the right positions to be able to tell the time!

Thank you for reading, please leave a comment (it's always nice to know whether people like what I make, or if they don't!) and happy crafting :)
x
Challenges entered:
Visible Image- make it sparkle
Happy Campers- Glitter it
Imagination Crafts- Glitter and Sparkle
WhoopsiDaisy- Things with wings
Events I will be at:
Saturday 30th November- Rhuddlan Artisan Fair
Sunday 1st December- Botanical Garden Christmas Event
Saturday 14th December- Christmas Craft Weekend Fayre
This event is in Rhyl Town Hall, there will be an ice rink outside in the town square, as well as Santa's grotto and all kinds of fun stuff.
Sunday 15th December - Christmas Craft Weekend Fayre
Monday, 25 November 2013
Time for a Clock ;)
Hello there everyone, I hope you are all well.
I am much better than I was when I last posted! Thank you for the kind, supportive comments you have made to me about that last post of mine-it's wonderful to know I am not alone.
This post has been a while in the making! I have been meaning to produce clocks for months now-so, without further ado, here it is:

I find metallic paint very difficult to portray in a photograph! It looks much more dramatic in reality than it does here!!
I used acrylic paints in: burnt umber, raw sienna, metallic copper, metallic copper gold.
Glitter frosting in Brown, sand, copper and gold (with the clocks mask)
lutradur paper-like fabric, friendly plastic and some two tone (copper/black) organza-all of which were heated with a heat tool before having paint applied.
pocket watch stamp (visible image) was used with paint rather than ink
stars are crafters' clay (Martha Stewart I think) then painted to match.
Paper flowers were painted to match and then layered before being attached to corner of lutradur.
Various clock and watch charms in bronze colour are from my stash.
The clock hands were painted with the metallics to match the rest of the piece.
Whole thing was done using a 10x12 canvas board as a base.
All quite the experiment, but now I know what works, I shall make some more along similar lines :)
Was absolutely good fun to make-which is what art and crafting is all about, right?
Let me know what you think,
Happy crafting
x
Challenges entered:
Visible image- make it sparkle (the metallic paint does sparkle and there are angelina fibres on here beneath the lutradur too-difficult to see from the photo I know)
Thursday, 21 November 2013
Dear Pain...a daily survivor of the struggle against my own body and mind
I tweeted this at half six this morning:
Dear pain, while you may be my constant companion, I would like it if you let me have a chance to have a life. That is all.
I don't usually go around telling complete strangers that I am anything but awesome! I just feel that, since I am certainly not the only one, it is time to say something about it. I am in constant pain each and every moment-whether I move or keep still has no bearing on it. The everyday pain I am now used to and go about doing things just as others go about their day. It is when the pain becomes so terrible that you can barely move and it feels as if your back and shoulders are on fire-that is when it stops me in my tracks and interferes with my life. I don't look ill. There is no cure for this and very little understanding from the world in general which makes the suffering something that is usually done in silence as nobody gets it and complaining just makes you unwanted. For anyone who would like an idea of what it is like to live each day with an invisible illness-the spoon theory is an excellent analogy that attempts to make it a bit easier to understand. While written by a woman with lupus, it is applicable to other conditions, particularly to fibromyalgia.
My increased pain exacerbates my depression. Depression lowers your pain threshold, thereby making my pain seem worse. Vicious circle anyone?
Today it took me two hours and codeine to be able to get out of bed. I am supposed to be on my stall on the market attempting to earn some money and make a living. The pain took that away from me. I will instead list items in my online store and would very much appreciate it if you could perhaps spam my website address all over the place :)
www.craftyshutterbug.co.uk
On the plus side, I have found my camera! So I will be able to add pictures to my post from yesterday-and perhaps post again later if I manage to make anything new.
If you read just one thing today, please take the time to make it the spoon theory. Thank you for stopping by. Happy crafting ;) x
Wednesday, 20 November 2013
Busy, busy
So, today is my day to be blogging a new card or something I have crafted. While I have been really busy all this week making cards and items to stock my stall with, I don;t actually have a single thing I am going to be able to blog as it seems I have misplaced my camera (like the genius I am!). I wanted to share with you all some of the candles I have been working on lately-particularly the gift set I have put together but without a picture, it is going to be very difficult to let you know what I have done! I shall endeavour to describe it all, and then will add a photo when I discover the hiding place of my camera!
I just got finished covering a box in tasteful black paper so that I can display the candles within it, making it the perfect gift for someone as we move ever closer to the festive season. I took a pillar candle 4.5' tall-purple and delightfully scented with blackberry and apple mmmm, and decorated it with a fairy woodland scene all silhouetted against the wonderful purple of the candle. The wings on one of the fairies I then painted white and added some iridescent glitter for that extra touch of sparkle.
I then used a matching small votive candle, I wrote the words 'Happy Christmas' in silver on the outside of the glass and painted some snowflakes in white around the top of the candle-these I added the glitter to as well. The wording can be replaced with any a customer would want-even a name can be written on the glass.
To finish off the presentation, I took a sheet of white tissue paper and stamped fairies and stars on it in versafine Imperial Purple ink-this matches so well with the candles and is exactly the right way to display these within the classy black box. I could even provide a hand made personalised gift tag if required-leaving absolutely no work for you to do!
I have these events coming up and would love it if you could pop by and say hello, and have a look at my work for yourself:
Thursday 21st November- Rhyl Market, High Street 9-5
Saturday 23rd November- One Big CrafTEA Fair
Thursday 28th November- Rhyl Market, High Street 9-5
Thursday 28th November- Let's Get Crafty...Again Prestatyn High School
Saturday 30th November- Rhuddlan Artisan Fair
Sunday 1st December- Botanical Garden Christmas Event
Saturday 14th December- Christmas Craft Weekend Fayre
This event is in Rhyl Town Hall, there will be an ice rink outside in the town square, as well as Santa's grotto and all kinds of fun stuff.
Sunday 15th December - Christmas Craft Weekend Fayre
Photos of the above described candle gift set:
The big candle:


the small candle:
 the tissue paper:
 The finished gift set:

Gift set is £10.
I just got finished covering a box in tasteful black paper so that I can display the candles within it, making it the perfect gift for someone as we move ever closer to the festive season. I took a pillar candle 4.5' tall-purple and delightfully scented with blackberry and apple mmmm, and decorated it with a fairy woodland scene all silhouetted against the wonderful purple of the candle. The wings on one of the fairies I then painted white and added some iridescent glitter for that extra touch of sparkle.
I then used a matching small votive candle, I wrote the words 'Happy Christmas' in silver on the outside of the glass and painted some snowflakes in white around the top of the candle-these I added the glitter to as well. The wording can be replaced with any a customer would want-even a name can be written on the glass.
To finish off the presentation, I took a sheet of white tissue paper and stamped fairies and stars on it in versafine Imperial Purple ink-this matches so well with the candles and is exactly the right way to display these within the classy black box. I could even provide a hand made personalised gift tag if required-leaving absolutely no work for you to do!
I have these events coming up and would love it if you could pop by and say hello, and have a look at my work for yourself:
Saturday 30th November- Rhuddlan Artisan Fair
Sunday 1st December- Botanical Garden Christmas Event
Saturday 14th December- Christmas Craft Weekend Fayre
This event is in Rhyl Town Hall, there will be an ice rink outside in the town square, as well as Santa's grotto and all kinds of fun stuff.
Sunday 15th December - Christmas Craft Weekend Fayre
Photos of the above described candle gift set:
The big candle:


the small candle:
 the tissue paper:

Gift set is £10.
Thursday, 14 November 2013
Cute Christmas
Hello to one and all,
I hope you all are well. I am very much the night owl right now as I have cancelled all sleep between now and Christmas! I am up late now finishing off some cards in between loading up my car for the market in the morning-although the wind is howling around my caravan at quite a pace :(
I like to have a new offering to add to my stall each time I am at the market, so here is this week's (design by the wonderful Cheremane Smith):
 (apologies for the image quality-I took it on my phone and emailed it to myself, I am not great with technology-just ask my brother!!)
Using a 6x6 card blank as the base. The cute lil guy in the stocking is a stamp from Fizzy Moon (same as the other cute stamp I used in my last post) and I coloured the image using Promarkers. The white fluffy edging around the top of the stocking and the brim of the hat are covered in white flower soft to appear all cuddly-adding to the all round adorable appeal of this character!
The wooden plank stamp by Visible Image was stamped in the shape of a fireplace using Weathered Wood distress ink and the Christmas Wishes sentiment stamp by Dreamees was stamped above the fireplace using onyx black versafine ink. This was attached to some silver mirror card and the whole thing stuck to coloured pearlescent card that had been embossed using the embossabilities snowflake folder.
A single card candi was placed in the centre of the fireplace using a foampad and the bear/stocking image was stuck using pinflair-the thin ribbon displayed as if it is hanging from the fireplace.
That same thin ribbon is used again in the top corner, along with a silver coloured metal charm in the shape of a gift (I sell these charms-currently in packs of 8 for £1, bargain!).
I have done these cards in the blue seen here, a slightly darker blue, pink, red and lilac.
Priced at just £1.75 each, I expect these will sell quite well.
Off to try to get some sleep now-being swayed about a bit though by the wind! Let's hope I don;t get blown out to sea!!
Have a great day everyone x
Events coming up:
23 November- One Big CrafTEA Fair
28 November- Rhyl Market, High Street 9-5
28 November- Let's Get Crafty...Again Prestatyn High School
30 November- Rhuddlan Artisan Fair
1 December-Botanical Garden Christmas Event
I hope you all are well. I am very much the night owl right now as I have cancelled all sleep between now and Christmas! I am up late now finishing off some cards in between loading up my car for the market in the morning-although the wind is howling around my caravan at quite a pace :(
I like to have a new offering to add to my stall each time I am at the market, so here is this week's (design by the wonderful Cheremane Smith):

Using a 6x6 card blank as the base. The cute lil guy in the stocking is a stamp from Fizzy Moon (same as the other cute stamp I used in my last post) and I coloured the image using Promarkers. The white fluffy edging around the top of the stocking and the brim of the hat are covered in white flower soft to appear all cuddly-adding to the all round adorable appeal of this character!
The wooden plank stamp by Visible Image was stamped in the shape of a fireplace using Weathered Wood distress ink and the Christmas Wishes sentiment stamp by Dreamees was stamped above the fireplace using onyx black versafine ink. This was attached to some silver mirror card and the whole thing stuck to coloured pearlescent card that had been embossed using the embossabilities snowflake folder.
A single card candi was placed in the centre of the fireplace using a foampad and the bear/stocking image was stuck using pinflair-the thin ribbon displayed as if it is hanging from the fireplace.
That same thin ribbon is used again in the top corner, along with a silver coloured metal charm in the shape of a gift (I sell these charms-currently in packs of 8 for £1, bargain!).
I have done these cards in the blue seen here, a slightly darker blue, pink, red and lilac.
Priced at just £1.75 each, I expect these will sell quite well.
Off to try to get some sleep now-being swayed about a bit though by the wind! Let's hope I don;t get blown out to sea!!
Have a great day everyone x
Events coming up:
23 November- One Big CrafTEA Fair
28 November- Rhyl Market, High Street 9-5
28 November- Let's Get Crafty...Again Prestatyn High School
30 November- Rhuddlan Artisan Fair
1 December-Botanical Garden Christmas Event
Thursday, 7 November 2013
Cute and Cuddly
Greetings one and all,
I hope you are all well :)
Sadly, I was unable to be on my stall on Rhyl market today due to pain in my lower back but it is gradually easing so I feel I should be being productive while resting on the sofa!
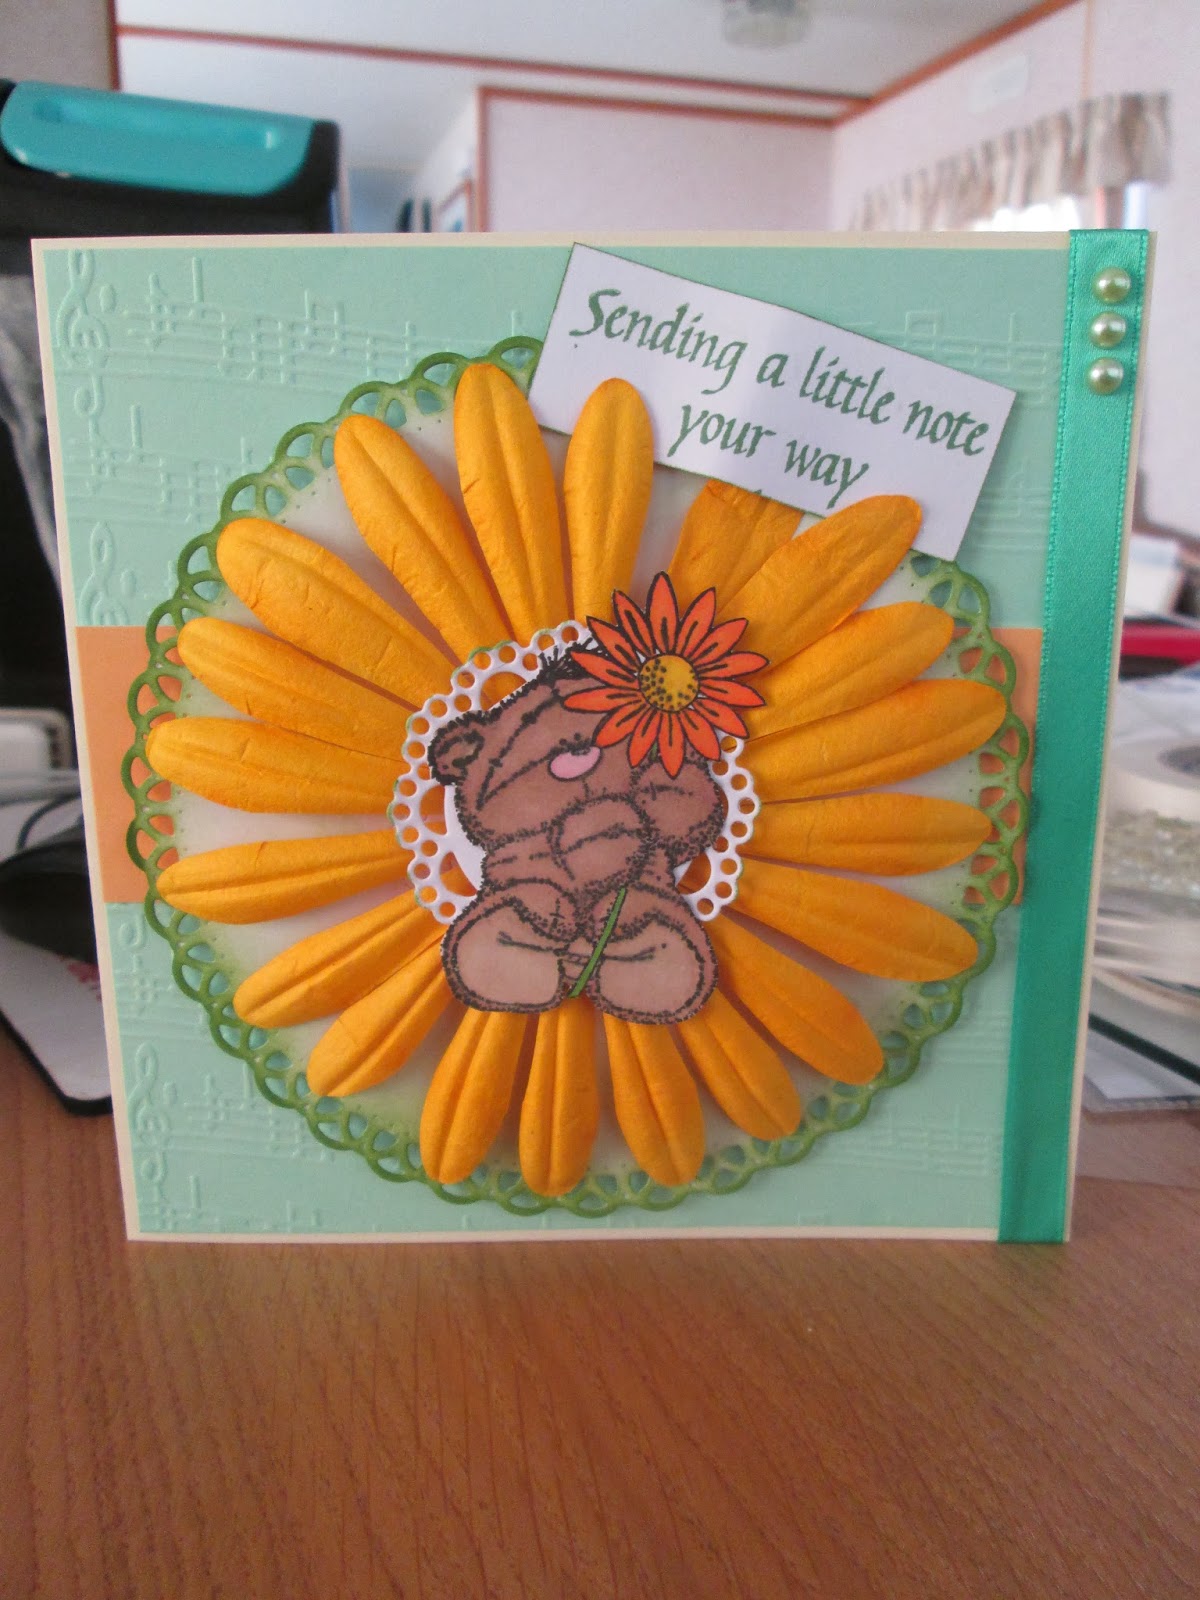
Today is a card that is really quite different to my usual ones-this one is brightly coloured and cute! (and, for a change right now, not remotely Christmas related!!)

The Fuzzy Moon stamp was coloured in using Promarkers and attached to a decorative die cut (Marianne die bought from Doodleso in Prestatyn) before being placed in the centre of a large paper flower (available at 3 packs for £1 at Donna's Kraft Kabin in Rhyl). I like to support local business when I can :)
A Spellbinders Grand Stately Circle (the smallest one) was then distressed around the edge with Mowed Grass distress ink and the flower/cute bear combo was attached to the centre.
Some mint green card was embossed using a music score embossing folder-this was attached to the front of a card blank. A strip of orange card was layered horizontally across this and then the topper attached using foam pads. Finished off with a sentiment stamped in green, some ribbon down the right hand side and some green tinted pearls on the ribbon.
Let me know what you think please guys-I always think whenever I try cute it looks like a child has made it!
Challenges entered:
creative card crew- teddy bears
card crafters circle- cute cards
challenges for everybody- anything goes
I hope you are all well :)
Sadly, I was unable to be on my stall on Rhyl market today due to pain in my lower back but it is gradually easing so I feel I should be being productive while resting on the sofa!
Today is a card that is really quite different to my usual ones-this one is brightly coloured and cute! (and, for a change right now, not remotely Christmas related!!)
The Fuzzy Moon stamp was coloured in using Promarkers and attached to a decorative die cut (Marianne die bought from Doodleso in Prestatyn) before being placed in the centre of a large paper flower (available at 3 packs for £1 at Donna's Kraft Kabin in Rhyl). I like to support local business when I can :)
A Spellbinders Grand Stately Circle (the smallest one) was then distressed around the edge with Mowed Grass distress ink and the flower/cute bear combo was attached to the centre.
Some mint green card was embossed using a music score embossing folder-this was attached to the front of a card blank. A strip of orange card was layered horizontally across this and then the topper attached using foam pads. Finished off with a sentiment stamped in green, some ribbon down the right hand side and some green tinted pearls on the ribbon.
Let me know what you think please guys-I always think whenever I try cute it looks like a child has made it!
Challenges entered:
creative card crew- teddy bears
card crafters circle- cute cards
challenges for everybody- anything goes
Sunday, 3 November 2013
Happily Ever After
Greetings one and all,
Having a fabulous weekend, I trust?
Today's post is a card I made for my friends in The US who got married very recently (congrats to you both, Steve and Lourdes).
I am in the midst of making Christmas cards so couldn't help but carry the magical theme across to this card, but a card to celebrate a marriage seems to me like it should be a bit magical :)

Stamps used are all from Lavinia Stamps I think: tree root, climbing ivy, star gazers, stars 1, star cluster, fairy dust silhouette, fairy dust is like love and happily ever after.
The process:
Using a brayer (an ink duster or distress tool would work just as well), some colour was added to white card as a background-Adirondack inks in Wild Plum and Eggplant. Then using versafine in onyx black, the tree, star gazing couple and fairy dust silhouette were placed on the card. I used the black ink and a brush to create the branch of the tree as I felt it was just more visually pleasing to have that fairy on a branch.
I ripped some card to shape and then distressed the eggplant ink along the bottom of the card, to give the impression that the couple were sitting on a rise by a lake. Climbing ivy was then stamped down both edges of the card multiple times in eggplant, versafine deep lagoon and the onyx black. Adirondack ink in sail boat blue was used to distress the edges all around the card, as well as to create the appearance of a lake in the bottom right corner.
Stars in wild plum and deep lagoon (highlighted with white opal liquid pearls after this image was taken) are what the couple are gazing at!
The wording 'Fairy dust is like love, it creates magic whenever you give it away' was stamped in onyx black and then stamped over in versamark and heat embossed using Sparkling Snow Wow powder. The words 'Happily ever after' were also embossed the same.
This scene was then layered on black card and mounted onto a purple pearlescent card.
I always find it fun working with fantastical/mythical imagery and this card was no exception!
I hope you have enjoyed reading about the making of this.
Take care,
until next time
x
Challenges entered:
Sparkle n Sprinkle- use embossing powder
LEJDesigns- Anything Goes
Through The Craft Room Door- Anything Goes
Sunday, 27 October 2013
Candles, candles everywhere!
I thought I posted this last night! My apologies.
A selection of the candles I have been decorating the past few days:
This because not everything has to be about Christmas:

The perfect gift, just because. I think some of you may recognise the sentiment stamp from Stamps by Chloe as I used it on the owl card but it looks entirely different here. The small rose stamp is by Visible Image and I think goes with this theme wonderfully. Sometimes, I think we don't always show our friends just how much they mean to us and a gift out of the blue goes a long way to show you were thinking of them.
The magical Christmas Candle I blogged the other day is available in two colour schemes: blue/green and purple/pink:

These are 6.5 inches tall and are selling at £4.99 each, can be personalised with a name or brief message for an additional 80p.
Finally for today, because I just adore Halloween:

Enjoy :)
I will be decorating more candles in preparation for the events I am booked to do in the run up to Christmas but tomorrow's post will not be candles.
Have a great remainder of the weekend everyone.
x
Friday, 25 October 2013
A Magical Christmas Candle
Greetings folks,
I hope everyone is well today. It's not warm in this part of the world, which is actually helping me to feel Christmassy! (I know that's not a word!) In addition to making more of the cards that I blogged yesterday, I have been experimenting with candle decoration :)
This is my first completed design that I am pleased with:

The stars and the tree stamp are from Lavinia stamps, the sentiment 'Wishing you a magical Christmas' is from Stamps by Chloe. Inks used: Memento Tuxedo Black, Versafine Deep Lagoon and Peacock Feathers Distress Ink.
This candle is around 6 inches tall and the finished product can be personalised with a name-or with a message (provided it's not too long). Perhaps this year sending a candle can be your thing rather than sending a card?!
I intend to add more candles as I create them, and if you would like a candle or a card made especially for your someone special this Christmas, then just send me an email at: Craftyshutterbug@gmail.com and we will come up with the perfect item.
Thursday, 24 October 2013
Christmas is coming!
Hello everyone :)
I hope you are all well, I have had some difficulties with my back today but am taking it easy and taking the painkillers-one reason I shall keep this post short ;)
Today is the Christmas card I mentioned yesterday:

White pearlescent card stock embossed with the Star Pere Noel embossing folder (Couture Creations from Creative Expressions) and then highlighted with some iridescent glitter and a Sakura quickie glue pen. This was layered onto some green card, I managed to get some ribbon that is almost the same colour as the card, and this I ran down the left side of the embossed design and then stuck it all on black card, before attaching it to the front of a white pearlescent card blank. Small green gems were used to add a splash of colour in several places and Meiflower teeny gems also added to bring some bling.
5 gems of varying sizes were added to the ribbon and 3 green gems to the top right corner of the design to complete it.

Inside the card simply says 'Merry Christmas' (stamp by IndigoBlu) in Peacock Feathers distress ink so that it matches the colours used on the front.
I like this card-I have made some in teal/peacock as well, and I am currently making more using purple rather than green or teal/peacock, (me and my non traditional colours!) but I could be persuaded to also make some using red I am sure ;)
Thanks for stopping by, leave me your thoughts below and I will be back with more tomorrow.
x
Challenges entered:
My Craft Creations-Anything Goes
Wednesday, 23 October 2013
Cards for the men
Greetings one and all,
Humblest apologies for neglecting you recently. I popped to Iceland for a short break as a treat to myself (it was incredibly inspiring and somewhere I will go back to), I cannot wait to get painting! (more to come when I actually get brush/knife to canvas!) Back to the run up to Christmas now: I am going to attempt to blog every day for a week-make sure I actually am productive now that I am back!
Today's offering is a design from the lovely Cheremane Smith, cards with a distinctly masculine theme-because the men in our lives are just so difficult to craft for!
I actually made these cards for friends of mine in the US. The birthday card for the husband of my boss when I lived over there-they were so much more than words can describe though-they are my American family. The new home card for my friends who got married in York in June (remember the painting I did for them?!). Both cards have gone to great homes, and I hope have brought a smile to the face of the recipient :)

Stamps used are from Visible Image-the toolkit and the handy hints stamp sets, along with the Happy Birthday sentiment (now discontinued I think). Inks used were distress inks in Salty Ocean, Chipped Sapphire and Stormy Sky. The tool brads in the top right corner are from my stash.
Weather permitting I shall be on my stall on Rhyl market tomorrow (they cancel it if it's particularly windy) so pop along and say hello-check out my new Christmas cards a day early ;) I shall blog tomorrow around this time, my new Christmas cards!
If any one wants one of these cards shown above making for them (price is £3 each or 2 for £5), just drop me an email at craftyshutterbug@gmail.com and I will get making it for you :)
Thanks for stopping by :)
Challenges entered:
Through the craft room door- Anything Goes
Love to Scrap- Play Some blues
Sunday, 6 October 2013
Altered Art-Ography
I hope you are having a lovely day. I would like to share today the project that I have been all excited about-it's something that I think people with either love, or they will think I have ruined my photo! I have basically crafted onto one of my photographs. Stamps and ink, embossing powders, charms, satin flowers, paper flowers, liquid pearls (an abundance of liquid pearls!), and other embellishments have all joined together in my photographic version of an Altered Art piece-I call it Altered Art-Ography as I started with a photograph rather than a canvas!
The image I used is this one:


 and heat embossing (care had to be taken not to burn the ink of the photograph from the paper)
 These pictures are in colour! I chose a monochromatic theme to tie in with the photograph. I have used: black, grey and white inks along with black, white, ivory and silver roses, white and silver decorative leaves, some silver coloured charms (from the massive stash I have-see the post all about them!!), wow! embossing powder in ebony and my favourite for this project, platinum metallic. Some silver/grey skeleton leaves from my stash, liquid pearls in onyx, silver, platinum and white opal and paper flowers (from Donna's Kraft Kabin) in black and grey.
The finished product:
 It is a one-off. I will not be crafting this photograph again. I had a lot of fun doing this and I am pleased with the result, I will have a try on other images of mine in the future :)
Thank you for taking the time to stop by and have a look. Enjoy the rest of your day. I would really appreciate some feedback on this so please leave me a comment below.
Challenges entered:
DigitallySweetChallenge- Anything with wings
Crafty Catz- Anything Goes
LEJ Designs- Things with Wings
Through the Craft Room Door- Anything Goes
The image I used is this one:

Angel of New Orleans
(Available as above, mounted, in 10x8" and 15x10")
So, I set to work, sticking and stamping


The finished product:

Thank you for taking the time to stop by and have a look. Enjoy the rest of your day. I would really appreciate some feedback on this so please leave me a comment below.
Challenges entered:
DigitallySweetChallenge- Anything with wings
Crafty Catz- Anything Goes
LEJ Designs- Things with Wings
Through the Craft Room Door- Anything Goes
Wednesday, 2 October 2013
A Christmas Card
Happy Wednesday to you all :)
Today I would like to share with you another Christmas card design. This one is less complex than the last, and much more traditional when it comes to the colours used but still with a modern feel. So, without further ado, here it is:

On a red pearlescent card base, snowflakes have been punched out along the bottom (I used a Martha Stewart punch), the letters of the word 'Christmas' were die cut (memory box type-writer lower case) from the same card stock as used for the card, and a snowflake (sizzix) was also die cut from the same as well as from white pearlescent card. The letters were stuck using whatever crafting glue i picked up! (I think it was Dovecraft) and a length of white satin ribbon attached to the card before sticking down the die cut snowflakes. A gem added and voila! Card completed :) An insert of pearlescent paper in an off white colour adds to the two colour effect as well as providing the user a place to write a message :)
For sale, this card comes with a quality white pearlescent envelope, please get in touch for details.
Also available: die cuts of the letters and of the snowflakes-please email with requests :)
Thanks for stopping by, feel free to comment and I will be back on Sunday. Have a great day :)
Challenges entered:
Crafting Musketeers- Christmas in October
Holly Jolly Christmas Challenge- No Patterned Paper
The ABC Challenge- W is for Words
Sunday, 29 September 2013
Christmas baubles
Hello, hope your weekend is going well :)
It's Sunday, which means I am here with a post about something other than a card-today is Christmas decorations! Baubles to be precise. I know it's still early yet but with these taking a while to make, I figured I would get started early to ensure I have enough for the fayres and markets I will be doing in the coming weeks and allow time for working on any specific products to fulfil orders placed.

Easy to make, just require some patience!
materials required:
Polystyrene ball
marker pen
tape measure
sharp craft knife
fabric (small amount needed so really any scraps can be used)
glue stick
pokey tool
Draw your design on the polystyrene ball, then use your knife to cut along the lines. Cut fabric to bigger than size of section, apply small amount of glue to section on polystyrene. Place fabric down and then use pokey tool to push edges of fabric into edges of section marked out by knife lines.
That is essentially it!
Can be made to order in any colour, or combination of colours. The metallic copper and turquoise colours you can see are paint, so I can paint designs and text onto the fabric as well. It will be my first Christmas in my own place this year so I am going to make one of these to commemorate that and give it pride of place on my tree!
These are 6cm in diameter but I can also do slightly smaller ones at 5cm diameter if requested. Can be finished with either ribbon or thin cord (in gold or silver) or left with just the loop you see in the blue and red bauble here. If you would like some baubles making or have any questions, please just send me an email at craftyshutterbug@gmail.com
Thanks for reading, happy crafting and I'll be back on Wednesday :)
Wednesday, 25 September 2013
A tag today
Hey there,
Hope you are all well. Just a short post today-I have been busy working on something new (I will blog it as soon as it is completed) and I am very excited about it! Today I am sharing a tag I made-I think these are a great idea, especially with Christmas on its way. If you don't have the time to make your own cards (you can always get me to make them for you!!), you could have a go at making a tag to attach to a card or gift-a handmade touch means so much more.
I will be attaching this to the lantern I blogged a few weeks ago, and if you are in North Wales you can see it tomorrow on Rhyl High Street on my stall on the market there.

So, very simply, the tag itself you can just cut from scrap card, or buy ready cut quite cheaply (I think mine was bought from asda or wilkinsons, somewhere like that!).
I used distress inks in Milled Lavender, Dusty Concord, Seedless Preserves, Fired Brick. I stamped with these as well as distressing with them.
Stamps used were Grunge Flourish, ink splats and small rose by Visible Image and Stampendous large butterfly.
I used some teeny gems from MeiFlower and dusted areas of the tag with Forever Violet Perfect Pearls before getting completely carried away with my liquid pearls! The sentiment is written in majestic Purple Liquid Pearls, and there are a few 'pearls' on the tag in this also.
(Details are easier to see on the tag than in the photo!)
That's it, thanks for stopping by. I will blog again on Sunday and I hope to see you at the market tomorrow, or hear from you-you can leave me a comment here or send me an email anytime :)
Enjoy the rest of your day.
Sunday, 22 September 2013
8x10" photographs
Hello,
I trust everyone is having a great weekend?
I can’t believe how nice the weather is again just now (apologies if it starts
raining-I didn’t mean to jinx it!)-I am hoping to get out and about with my
camera shortly but wanted to share with you what I have been holed up all
weekend working on!
I now have my photographs available in
another size, perfect for those with smaller wall space and also ideal to give
as a gift!

There are 60 in total and
they include most of the images you have seen to date on here along with many
more. The photographs are 8x10 inches in
size and each comes mounted, backed and wrapped for display and
protection. The mounts measure 11x14
inches and vary in colour, some are black, some are grey, some are cream and
most are white, some have a slight texture while some are smooth. These images do not do them justice at all,
so if you can make it to one of the markets I have a stall at please do and you
will be able to see for yourself :)
My favourite of the day is this one:

Titled: In Search of Fairies, it is a black and white
image-very striking in a black mount (also available mounted in other colours).
What you see is the Conwy river as it
winds through Snowdonia National Park close to Betws y Coed (just a little downstream
from Fairy Glen) I have colour photographs of the area close to that seen here
but this is my favourite-I am partial to black and white photography
though!
These are for sale at £14 each or 3 for £40
but if you follow my blog then you can get 3 for the bargain price of £35.
Right, I am off out for a little while now,
then back to the grindstone to get messy with some ink and paint as I get going
with Christmas cards and my first attempt at a mixed media canvas!
Have a great rest of your Sunday and I’ll
be back on Wednesday.
Thursday, 12 September 2013
First of the year
Greetings to you all,
Well, I guess summer is officially over now-I saw Christmas stock in Tesco yesterday! So, here is the first of my Christmas cards for this year:

I decided to opt for something different as a base, rather than the more traditional red or green for this one (they will come soon!!). Using purple card stock folded to be just a tad smaller than 5x5 inches (I have some lovely 5x5 inch silver envelopes that I have been dying to use for a while now and these cards are absolutely perfect for them), I used Black Soot Distress ink to shade the corners and slightly distress the edges of the card. I then took the 'Merry Christmas Tree' stamp by IndigoBlu and stamped it using Versamark clear pigment before making it pop with Metallic silver Wow embossing powder and the ever so handy heat tool.
Staying with the black soot ink, I put the Stars1 by Lavinia Stamps 2 or 3 times into each corner before then using a small Merry Christmas sentiment from my stash (could have been a magazine freebie, I do not recall) stamped close to the top left corner, where Majestic Purple liquid pearls finish the look by adding some subtle shine.
Inside the card is a simple white insert with 'Merry Christmas' embossed in silver along the centre and plenty of space to write your own message.
These are for sale from today at £1.20 each or £5 for 5-I recommend getting orders in early and then that's one less thing to think about as the festive season draws near. Email me at: CraftyShutterbug@gmail.com for further details or to get your cards.
Challenges entered:
Simonsaysstamp- Embossing
Sparkle N Sprinkle- Anything Goes with glitter, embossing powder and/or flocking
Creative Creations- Early Christmas Makes
Card Mania- Favourite colour combination
My Craft Creations- Stamped image challenge
Sunday, 8 September 2013
The beauty of nature
Hello world, I hope you are all having a great weekend. The horrendous rain here on Friday highlighted a couple of leaks in my roof, but other than that it was a pretty great day-I headed on out to Llandudno and picked up some craft items I needed at bargain prices, as well as storage for some of the art and craft stuff that has currently hijacked my living room! I returned somewhat bedraggled and resembling a drowned rat, but was all excited at the parcel waiting for me-printed cards of some of my photographs (from a well known very reasonable online printers).

This one I called 'Murmuring Vale'. It is the Conwy river as it gently meandres out from the Fairy Glen area of Snowdonia National Park. The light was just perfect on the lovely day in April when I caught this idyllic scene there-I don't know about you, but I think the water looks inviting! A paddle in a cool river would be wonderful right now as I just got in from a brisk walk along the seafront.
The seafront here has many facets, beautiful and dramatic, and they vary with the light and the weather and the mood of the ocean. Today the water was definitely more grey than blue and, from the waves pounding the wall, it seemed rather choppy but that did not stop one adventurous crew from getting out there!

Sunsets on the seafront are especially spectacular and one of my shots that I consider amongst my all time favourites is a sunset in September just a little way along the front from me here. I call it 'Heavenly Glow' as the distinct rays of the sun streaming through the cloud look as if someone above has turned a spotlight onto this stretch of coast! I hope you enjoy looking at it as much as I do.

Well, I guess I just did my bit for Rhyl tourism! haha. Take care everyone, and I am off now to get started on my next card design, see you Wednesday :)
Wednesday, 4 September 2013
Friendly Owl Card
I hope everyone is enjoying the weather! (apologies if you don't have a lovely sunny day where ever you are)
Today's post is a card-and I am still getting used to the protocol for blogging cards so bear with me!

Beginning with a cream coloured A5 card blank, I stamped the Visible Image Grunge Flourish randomly all over the front using distress inks in: Rusty Hinge, Vintage Photo and Gathered Twigs before then distressing the edges with Vintage photo. The grunge flourish is one of my favourite stamps-incredibly versatile and never boring! I ripped two pieces of Tim Holtz Kraft Core card in brown, one smaller for the stamp and one larger for the background, and distressed them both with some fine sandpaper. The larger one was stamped in gold with part of the grunge flourish in the bottom right corner before having its edges run across the gathered twigs ink pad and then being attached to the card. The sentiment reads 'For a Wonderful Friend' and is from Stamps by Chloe, I stamped it in Brilliance Galaxy Gold by Tsukinek and in Memento Tuxedo Black.
The die cuts-an owl (not sure of die, bought as a cut from Donna's Kraft Kabin in Rhyl) and the larger flower (bought as cut from Pier Crafts in Llandudno-I think it's from Spellbinder's Bitty Blossoms) were coloured by dabbing with the gold ink pad and then dusting the different brown shades of the previously mentioned distress inks across. The owl was then stuck on a piece of coredinations card from the Tim Holtz/Ranger distress collection, the two smaller flowers are just this pale brown coredinations card ripped and rolled.
All visible corners within the design were dabbed with Hot Cocoa liquid pearls, the brown ribbon, owl charm and golden yellow pearl gems are all just from my stash (I have lots of charms in my stash!!).
I hope you enjoy the card as much as I enjoyed making it. Thanks for stopping by, happy crafting!
Challenges entered:
Card Mania Challenge-Ribbon
Craft Dee Bows- Anything Goes with a handmade bow
The Crafty Bloggers Network- Things with Wings
Lady Anne's Challenge- Must have Wings
Love to Scrap- Anything Goes
Make It Monday- Anything Goes
Parade Your Crafts- Anything Goes
Scrapbook Stamp Society- Anything Goes
Simon Says Stamp- Stamping All Stars
Squigglefly- Add a flower
Bearly-mine- Anything Goes
Cards und more- Anything Goes
Just Inspirational- Animals
Loves Rubber Stamping- Anything Goes
Papertake weekly- Anything Goes
Happy Campers- Use a Stamp
Creative Card Crew- Things with wings
Subscribe to:
Posts (Atom)